
Showing posts with label photoshop. Show all posts
Showing posts with label photoshop. Show all posts
Wednesday, January 18, 2017

Wednesday, January 11, 2017
kinda getting there
Getting there.
"There"
I wish it was that physical and simple.
"You need to get it to the next level!"
"Where the F is that?"
"You know when its THERE."
Oh F u mf ba c.
That's what I used to think.
nah, that 'there' is there. It exists. We jus don't know where lol.

People use tools to get there.
To find out if you're there yet.
Like astrology. (yeah that's right i said something super important)
Oh snap.
We should study astroarcheology and get galactic but we ain't all Harvard.
So we use simple tools like RGB indicator.

All these numbers don't make sense unless you know some basic info.
Like, in computer shit, the number 255 recall multiple times. It's math.
So, if Red Green and Blue is 255/255, it means, well, 1/1 right? It maxes out data, and becomes White.
0/255 is 0/0 and therefore it is No Data = Black.

You can physically see how much data you got.
That can get you to realize things like "Oh, this bright cream color is actually like 98% white and I shouldn't fuck around anymore..."
curve tips

Histogram is a gram (data drawing) of light "history".
The amount of lights that's been captured as data, in digital photography.
So, basically, it shows stuff like "HEY WATCH OUT THERE'S THAT MOUNTAIN IN THE MIDDLE!"
That middle part rises like needle.

So,
That little kink is actually the skin.
What does it actually mean???
It means, that if you put your control point (white square) OVER the kink, some color blows (it turns into 100% White).
If you put the control point UNDER, it tones down the color (RGB. color meaning all photon data).
yea yea shit that don't make sense watevs.
Aight.
So, put that square where it IS if you wanna retouch skin, cuz natural is best for nature.
Monday, December 26, 2016
how to retouch
whats happening is that, some smudges and dark parts are fixed.
I used two layers to do this.
1. a curve to generally brighten
2. 50% neutral density soft light layer w/ dodge + burn for detail creases (wrinkles)
Her left side of cheek has this darkening.
I fixed, but you can see few percent of color difference.

Wednesday, January 13, 2016
TOOL Lingo
Industry is a sly bitch.
Imagine you're an intern. You get yelled. You reach for help. And you discover....
INDUSTRY LINGO 101 for Photosop.
1. J-Tool (Jay-Tool) : "Healing Brush Tool". It is too long and hard to remember.
2. O-Tool (OH-Tool): Known as "Dodge and Burn".
3. B (Bee): Brush Tool. Can be used on ANY Layer. Most versatile.
WRONG TERMS:
Clone Brush: It is Clone STAMP Tool. Often mistaken for J-Tool as results are similar (not really).
Healing Stamp: There is only 1 Stamp, and many brushes.
Imagine you're an intern. You get yelled. You reach for help. And you discover....
INDUSTRY LINGO 101 for Photosop.
1. J-Tool (Jay-Tool) : "Healing Brush Tool". It is too long and hard to remember.
- Shift + J: to switch, otherwise J is "Spot Healing Brush Tool" by default. Very different.
2. O-Tool (OH-Tool): Known as "Dodge and Burn".
- use lower % for Wacom tablet.
- Shift + O: before asking "how to switch between dodge and burn?"
3. B (Bee): Brush Tool. Can be used on ANY Layer. Most versatile.
- Often followed by "Press X" (Press-Ex): FOR MASKING.
- "B-Button": If someone says "B button" by accident, he's either an elderly or Geek Wizard ;))).
4. Q-Mode (Qeue-mode): Press Q. It is Quick Mask "mode". Don't freak out when everything is Red.
- "Don't freak out": Often people panic because it often turns everything RED. Press "Q" again.
- "Press B": Press B right after Q to make life easy. Check your Opacity and Hardness % before clicking.
5. "Ask Google": Open internet. Google it.
WRONG TERMS:
Clone Brush: It is Clone STAMP Tool. Often mistaken for J-Tool as results are similar (not really).
Healing Stamp: There is only 1 Stamp, and many brushes.
Friday, January 8, 2016
002
1200% is where you want to go if you need to go pro'er than pro.
It means, you really don't have to.

PIXEL is the new-age definition of imagery.
No longer chemical floating between plastic. Pixel.
Pixel means, first, you can zoom in.
Pixel means it is no longer physical.
Pixel means everything is numerical.
Each pixel is RGB (R=xxx, G=yyy, B=zzz)
ZZZ!.
Go to sleep. Class is over.
This is it. That's all. There is nothing beyond #002.
Use the knowledge for yourself !
It means, you really don't have to.

PIXEL is the new-age definition of imagery.
No longer chemical floating between plastic. Pixel.
Pixel means, first, you can zoom in.
Pixel means it is no longer physical.
Pixel means everything is numerical.
Each pixel is RGB (R=xxx, G=yyy, B=zzz)
ZZZ!.
Go to sleep. Class is over.
This is it. That's all. There is nothing beyond #002.
Use the knowledge for yourself !
000
New Year!
Happy. Be happy.
I was walking along the construction site to see a Jamaican-looking dude doing paint jobs.
Moments later when I walked pass by again, I smelled some hint of green (like the medicinal weed green).
This is the second out of second time (2/2) that the same thing has happened.
It made me happy. Don't ask me why.
The manager looking dude who came by also looked happy.
Ask them. :)
I'm posting photoshop 000 today.

This is called the "3-point curve".
It is the first thing a retoucher would learn.
Look at the dots.
I made 3 of them.
Along the Vertical lines.
This is how it goes:
The RIGHT one is the light one
The MIDDLE one is the base
The LEFT one controls darkness.
Cover the BASE, then control the Light and Dark.
Controlling midpoint (the middle dot) controls overall contrast when those other 2 dots are created.
Otherwise, you read the mountain (histogram) and do wut you wana do.
Happy. Be happy.
I was walking along the construction site to see a Jamaican-looking dude doing paint jobs.
Moments later when I walked pass by again, I smelled some hint of green (like the medicinal weed green).
This is the second out of second time (2/2) that the same thing has happened.
It made me happy. Don't ask me why.
The manager looking dude who came by also looked happy.
Ask them. :)
I'm posting photoshop 000 today.

This is called the "3-point curve".
It is the first thing a retoucher would learn.
Look at the dots.
I made 3 of them.
Along the Vertical lines.
This is how it goes:
The RIGHT one is the light one
The MIDDLE one is the base
The LEFT one controls darkness.
Cover the BASE, then control the Light and Dark.
Controlling midpoint (the middle dot) controls overall contrast when those other 2 dots are created.
Otherwise, you read the mountain (histogram) and do wut you wana do.
Sunday, December 27, 2015
when sh$t is fuck@d up
It's hard to tell how color works unless you see it happening.
Sometimes, we fuFck things up.
Sometimes, that color on that corner is off.
Sometimes, the whole range of spectrum is just off.

Sometimes, life gets complicated and twisted.
It takes a lot to fix it.
It dwindles and cross turns.
Like that green getting in your way.
So this is how it look when shit is just fusked up.
There's always order somehow, and when you don't know what's 'right' or 'wrong', follow whatever that looks better/beauty ;).
And if you don't know what's beautiful... step out and look at nature.
Sometimes, we fuFck things up.
Sometimes, that color on that corner is off.
Sometimes, the whole range of spectrum is just off.

Sometimes, life gets complicated and twisted.
It takes a lot to fix it.
It dwindles and cross turns.
Like that green getting in your way.
So this is how it look when shit is just fusked up.
There's always order somehow, and when you don't know what's 'right' or 'wrong', follow whatever that looks better/beauty ;).
And if you don't know what's beautiful... step out and look at nature.
Saturday, December 26, 2015
tricolour

When I was a teenager, I saw this movie that blew my mind.
Tricolor.
It was a three-part movie on love.
It's a french film, but the director isn't french.
It's a classic. You know what I'm talking about.
Red White and Blue.
Red blew my mind.
The color red. So innate. Deepest colour, I swear.
Sunday, November 29, 2015
posting curves.
This is photoshop 401.
What? You thought you graduated?
Please use this technique to recreate color that is specific.
I use my curve tool to its maximum limit.
Basically, if you have a car, you full speed max to the pedal. Non stop.
The first concept to understand when using curve tool is to use all adjustments.
There are 3 adjustments in curve tool.
Step 1 is to get out of normal.


Darken, Multiply, Color Burn... all those clustered are to darken pixels.
From Lighten to Lighter Color are lightening effects.
Overlay all the way to Hard Mix deals with contrast.
Rest is yours to explore.
Step 2 is the curve itself.
There are RGB, Red, Green and Blue channel.


The R,G and B-channel controls will balance the effect of the curve even further, resulting in much controlled color in your photography.
Consider this minute control as a support to your daily curve tooling.
Step 3 is masking. You decide where it should go. ;))
What? You thought you graduated?
Please use this technique to recreate color that is specific.
I use my curve tool to its maximum limit.
Basically, if you have a car, you full speed max to the pedal. Non stop.
The first concept to understand when using curve tool is to use all adjustments.
There are 3 adjustments in curve tool.
Step 1 is to get out of normal.

don't be Normal!

know what you're choosing
Darken, Multiply, Color Burn... all those clustered are to darken pixels.
From Lighten to Lighter Color are lightening effects.
Overlay all the way to Hard Mix deals with contrast.
Rest is yours to explore.
Step 2 is the curve itself.
There are RGB, Red, Green and Blue channel.

changes are very delicate, because layer is no longer 'Normal'.
adjustment requires accuracy.

with combined 4 layers,
changes no longer seem to be small.
The key is to use all 3 colors to adjust.
While RGB channel seems perfect that controls all, it is easy for colors to add noise and/or reveal undesired color.


notice the green between red and blue.
it is bridging the two, and thus therefore adjustment was needed.
The R,G and B-channel controls will balance the effect of the curve even further, resulting in much controlled color in your photography.
Consider this minute control as a support to your daily curve tooling.
Step 3 is masking. You decide where it should go. ;))
Wednesday, November 25, 2015
Pshop 301

In reality (industry/jobsite), you learn courses 101-303 at-the-same-time.
When you press (alt/opt. + click the 'create a new layer' button) you get the "New Layer" box.
There are more ways to get to this 'box'. Ask google.
Copy what I clicked.
My ex-NY photographer friend Taichi showed me this trick.


I created this 'Soft Light-neutral' layer to trick the computer.
This is how it works.
Layer (Neutral + Contrast = Nothing happens) + (burn'-n'-dodge tool) = Super-safe light-data quick Burn-n-Dodge layer that does not affect the pixel. It's an overcast.
(**There are advantages and dis-advantages using any tricks. Please b smart)
Burn and Dodge tool affects pixel itself. This trick is to avoid direct interaction between the two. This trick is standard in some part of the industry.
The advantage of Burn and Dodge tool is standard in retouching skins.
It's the most delicate tool that has the versatility and ideal effect over pixels when recreating beautiful skin.

right image is brightened

compare and contrast
this is about 60-80% done
Usually, you would zoom to 400% and be using a wacom pen, at brush-size aligned to skin's each creases with strength 2-5% for burning, 5-10% for dodging ("It always burns faster").
That is for high-standard fashion and it takes x8-time to complete.
For I-Don't-need-to-Cyborg photos, I only zoom to 200%, and would be using watevs that makes him look good.
Tuesday, November 24, 2015
Photoshop 201
Did I give 101?
"My teacher said, it's all about the 'masking'."
Said the girl...
I'll mask you soft and hard. Get you excited, because it's twisted. That's Photoshop 101.
Photoshop 201 is putting layer on layer.
202 is putting layer on a layer on a layer.
Wow.
What does that mean?...
Let's explore...

I made two layers here. Screen and Multiply.
both layers are untweaked.
ON: Opacity - 100%
both layers are untweaked.
ON: Opacity - 100%
This is Marc Iserlis.
He is an aspiring young actor hopping around NY and Asia and stuff like that.
I put my 'Curve' on 'Screen'.
(My Curve layer "screeminator" is switched to 'Screen' whereas its usually 'Normal'.)
((I usually use 3 layers. Darkening, lightening and contrast. as standard...))
Then I do changes on the 'Curve' tool.
I control the wave so that 'Curve Tool' makes sense. (bottom image: I put 2 control points on my curve tool wave thingy)
You're supposed to make curves, "Duh, get it?" Right, I got it.
...
..
.
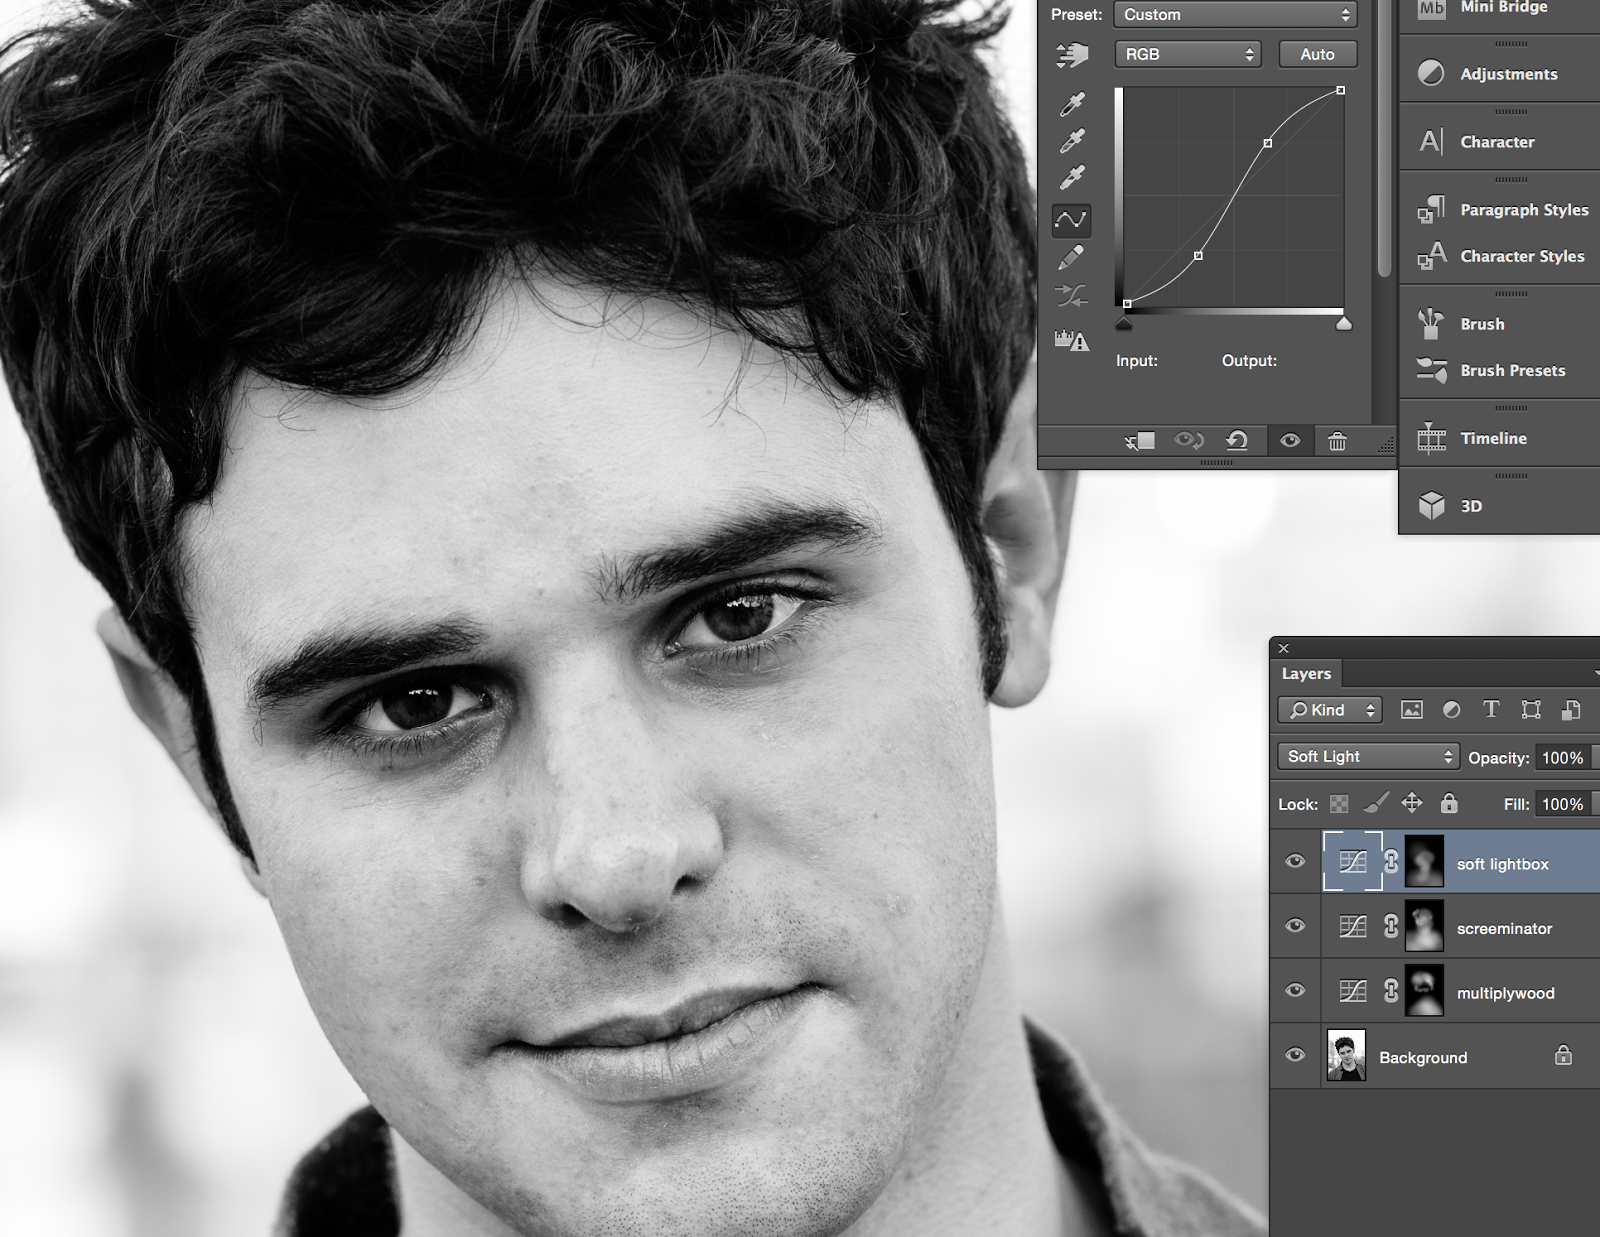
Marc Iserlis
step 3 is precision and control.
You select what where when why who and mask the shit out of it. Make it happen.
...NEXT...
Friday, November 20, 2015
color contrast

You can create contrast between presented colors by adding contrast in Saturation.
Color is 3-dimensional.
Hue, Saturation and Tone. Tone is Luminance.
Lets cut the complicated talk #crap and visually understand things.
The coordination of the points presented in the graph above tells you that it basically looks like wave.
This one will make Yellow color more 'pop' because the dudes next to him are shorter.
Then the BPM is the side gangs that also pops out head high.
That's contrast.
The deviation between Aqua and Blue dictates the emphasized contrast of Blue due to ooh jee sleeping time has approached........
good night.
Wednesday, August 5, 2015

Lombok House, Gerupuk, Indonesia
architect - Paula Hueta (Bambook Studio)
Photoshop becomes geekish.

When your curve is hitting the mirror of your mountain (histogram), it means something.
It means I can cut time, work faster and better.
I don't care the rest but it works out like its like the other you , trapped in you, trying to come out, so I mirror the pattern and somewhere in the color, that missing link comes back to you. In color.
Oh that photo (mirror reality) had this much color (realness)!
Is the effect I end up with.
Of course you cannot do consciously because each mountain (histogram) makes a different story.
Sometimes it doesn't look like a double-helix. But just like dancing.
Subscribe to:
Posts (Atom)